Simplicity 9880 came with a full sleeve that gathered into the armscye, which is fine but wasn't the look I wanted for most of the versions of it I plan to sew. I needed a new fitted sleeve pattern. I wasn't dealing with an actual bodice block, though--I needed one that would fit the bodice I was using. So . . . I winged it.
Note: I did this with "pattern pieces" that were about 20% of full size, just to make them easier to deal with. This is why my measurements are so tiny. The process is the same for full-sized pieces, though.
1. Trace your bodice pattern (never use an original, so if something goes wrong you haven't spoiled your source material). The seam-line here is marked in red. This is important: Everything I'm doing here is based on the seam line, not on the outer edge of the pattern piece. If you use the outer edge, your sleeve will end up too small.

2. Either perforate the seam line or cut the seam allowance off entirely. You'll add seam allowance to the sleeve later; you don't need it right now.

3. Measure your arm and choose your sleeve circumference.

4. Measure the seam line for both the front and back bodice pieces (yours will be a lot longer than this):

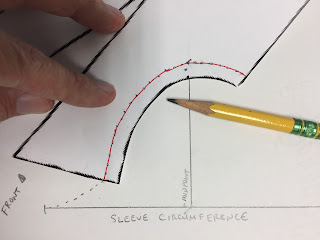
5. Divide the difference by two and mark the half-difference past the midpoint of the sleeve circumference, toward the shorter side. In this instance, there was 1/4 inch difference and the back armscye was shorter, so I moved the new "midpoint" 1/8 inch toward the back. Draw a perpendicular line from the adjusted midpoint/shoulder seam line.

6. Trace the underarm curve from the beginning of the sleeve circumference line to the pattern marking. This is the front armscye, traced as far as the single triangle marking.

7. Turn the pattern piece upside-down and flip right-to left, and continue tracing from the point where you stopped at the triangle mark to the vertical shoulder-seam line. Inverting the pattern piece better approximates the shape of a finished sleeve piece.
8. Repeat for the back armscye using the back bodice piece, tracing to the double-triangle mark, then inverting and flipping the back bodice pattern to finish the curve.

9. Comparison of the bodice height vs. sleeve cap height. Not bad.

10. Smooth out and adjust the shape of the curve, measuring to make sure you don't stray too far from your armscye circumference. Measure and draw in your seam allowances.
The pattern piece I got from doing this with Simplicity 9880 looked like this, which is a pretty normal sleeve pattern shape:

A test armscye based in place:

Sleeve on the finished dress:

Note: I did this with "pattern pieces" that were about 20% of full size, just to make them easier to deal with. This is why my measurements are so tiny. The process is the same for full-sized pieces, though.
1. Trace your bodice pattern (never use an original, so if something goes wrong you haven't spoiled your source material). The seam-line here is marked in red. This is important: Everything I'm doing here is based on the seam line, not on the outer edge of the pattern piece. If you use the outer edge, your sleeve will end up too small.

2. Either perforate the seam line or cut the seam allowance off entirely. You'll add seam allowance to the sleeve later; you don't need it right now.

3. Measure your arm and choose your sleeve circumference.

4. Measure the seam line for both the front and back bodice pieces (yours will be a lot longer than this):

5. Divide the difference by two and mark the half-difference past the midpoint of the sleeve circumference, toward the shorter side. In this instance, there was 1/4 inch difference and the back armscye was shorter, so I moved the new "midpoint" 1/8 inch toward the back. Draw a perpendicular line from the adjusted midpoint/shoulder seam line.

6. Trace the underarm curve from the beginning of the sleeve circumference line to the pattern marking. This is the front armscye, traced as far as the single triangle marking.

7. Turn the pattern piece upside-down and flip right-to left, and continue tracing from the point where you stopped at the triangle mark to the vertical shoulder-seam line. Inverting the pattern piece better approximates the shape of a finished sleeve piece.

8. Repeat for the back armscye using the back bodice piece, tracing to the double-triangle mark, then inverting and flipping the back bodice pattern to finish the curve.

9. Comparison of the bodice height vs. sleeve cap height. Not bad.

10. Smooth out and adjust the shape of the curve, measuring to make sure you don't stray too far from your armscye circumference. Measure and draw in your seam allowances.
The pattern piece I got from doing this with Simplicity 9880 looked like this, which is a pretty normal sleeve pattern shape:

A test armscye based in place:

Sleeve on the finished dress:

Comments