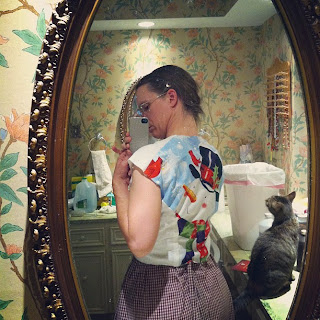
Test bodice #1. Excuse the horrible fabric. It was on clearance.

This wasn't bad, but there was a little too much pooching behind the arm.

I changed the curve of the side/back piece a bit and it isn't perfect but it's fixed enough for this go-round. It looks better when I'm not twisting to photograph myself, too, I promise.
I had a coupon for Joann's so I got a bunch of blue triple-windowpane check homespun:

I got this striped fabric ages ago at Wal-Mart. I overdyed it with three boxes of Rit (1 teal, 1 dark green, 1 Kelly green) and was originally going to use it for the whole dress, but it seemed a bit stiff. Too stiff for sleeves, for instance. I used it for the lining instead, and it was ideal. It's not so much heavier than the homespun that it makes the dress bulky, but it still gives the bodice some structure.

To make a lining, I just cut a second bodice out of the green fabric. The only difference was that I cut it shorter on the outer edge (along the front opening), where the outer fabric will fold over to make the button placket. Here it is, assembled except for the shoulder seams, which will get sewn up together with the outer bodice (more on this below):

This is what I did for the sweetheart yoke on the bodice. I actually did this wrong; I should have ended the curve at the outer edge of the button placket, not the inner edge (the fold-over is for the self-facing). The bodice isn't actually asymmetrical but it will look that way because the end of the curve on the underlapping bodice half is covered up.
 I should have done this. Live and learn.
 Anyway, the result looked like this. It was a bit clumsy but worked out well enough. That's piping in the seam.

I assembled the lining and outer bodice separately, except for the shoulder seams. Then, I basted them wrong sides together and sewed the shoulder seams through four layers as if the two layers were only one. I'll finish the shoulder seams by hand.
The bodice so far. You can see how the point of the yoke doesn't match up because the end of the curve on the right (your left) is covered.
I absolutely love the overall look, though. I'm definitely doing this again, better, on another dress.

The original sleeve. The diameter of the lower sleeve, I kid you not, is almost as big around as my waist.

I folded two inches out of the sleeve cap and several inches out of the sleeve width. The finished redrafted sleeve will be 16 inches in diameter, finished, and won't be belled out toward the bottom.


This wasn't bad, but there was a little too much pooching behind the arm.

I changed the curve of the side/back piece a bit and it isn't perfect but it's fixed enough for this go-round. It looks better when I'm not twisting to photograph myself, too, I promise.

I had a coupon for Joann's so I got a bunch of blue triple-windowpane check homespun:

I got this striped fabric ages ago at Wal-Mart. I overdyed it with three boxes of Rit (1 teal, 1 dark green, 1 Kelly green) and was originally going to use it for the whole dress, but it seemed a bit stiff. Too stiff for sleeves, for instance. I used it for the lining instead, and it was ideal. It's not so much heavier than the homespun that it makes the dress bulky, but it still gives the bodice some structure.

To make a lining, I just cut a second bodice out of the green fabric. The only difference was that I cut it shorter on the outer edge (along the front opening), where the outer fabric will fold over to make the button placket. Here it is, assembled except for the shoulder seams, which will get sewn up together with the outer bodice (more on this below):

This is what I did for the sweetheart yoke on the bodice. I actually did this wrong; I should have ended the curve at the outer edge of the button placket, not the inner edge (the fold-over is for the self-facing). The bodice isn't actually asymmetrical but it will look that way because the end of the curve on the underlapping bodice half is covered up.


I assembled the lining and outer bodice separately, except for the shoulder seams. Then, I basted them wrong sides together and sewed the shoulder seams through four layers as if the two layers were only one. I'll finish the shoulder seams by hand.
The bodice so far. You can see how the point of the yoke doesn't match up because the end of the curve on the right (your left) is covered.
I absolutely love the overall look, though. I'm definitely doing this again, better, on another dress.

The original sleeve. The diameter of the lower sleeve, I kid you not, is almost as big around as my waist.

I folded two inches out of the sleeve cap and several inches out of the sleeve width. The finished redrafted sleeve will be 16 inches in diameter, finished, and won't be belled out toward the bottom.

Comments